How to Use the Maps Dashboard in the WordPress US Map Plugin
Learn how to create and manage interactive US maps, copy shortcodes, export or import complete map configurations, and control access to the plugin settings.
The Maps Dashboard is the central place for managing maps created with the WordPress US Map Plugin. From this screen, you can create additional maps, open their settings, copy shortcodes, delete maps, export complete configurations, and restore maps from JSON files.
When the plugin is installed, it automatically creates the first map with the name New map. You can start configuring this map immediately or create additional maps for different pages, departments, territories, or projects.
Each map has its own settings and shortcode. This means that one WordPress website can display several interactive US maps with different colors, state content, groups, points, and behavior.
This guide is part of our WordPress US Map Plugin overview and documentation series.
Maps Dashboard overview
Open US Map → Maps in the WordPress administrator menu to access the Maps Dashboard.
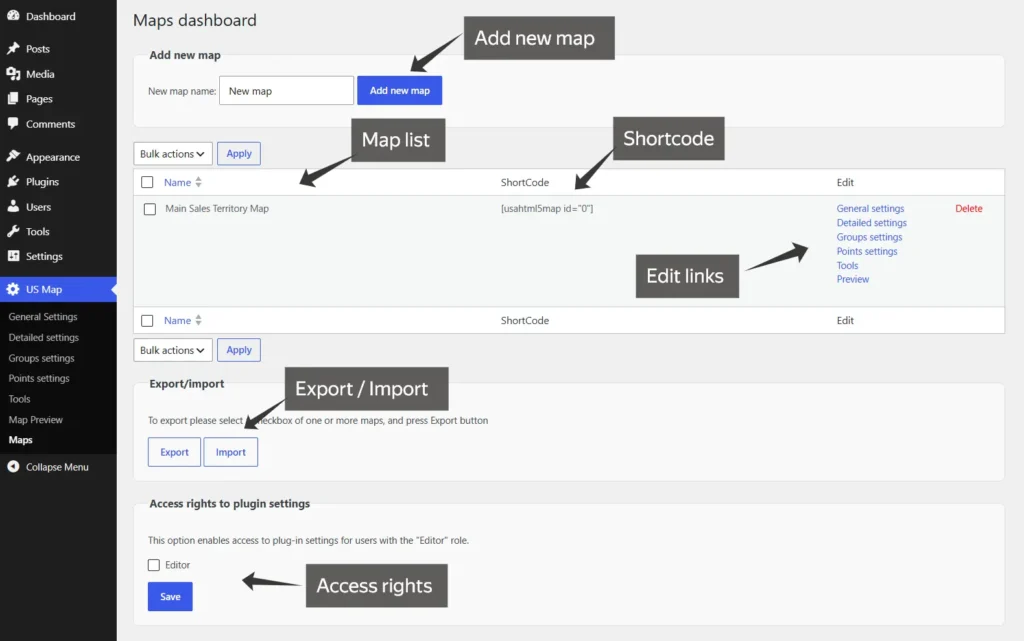
The screen is divided into several functional areas.
Add new map
The Add new map section creates another map configuration. Enter a descriptive name and click Add new map.
The name helps you identify the map inside the WordPress dashboard. Clear names become especially useful when the website contains several maps.
Examples include:
- Main Sales Territory Map
- Dealer Locations
- Regional Contacts
- Homepage Map
- Service Areas
The first map named New map is created automatically when the plugin is installed. You can rename or configure it instead of creating another map immediately.
Map list
The central table displays all maps created with the plugin.
Each row includes:
- a map selection checkbox;
- the map name;
- its shortcode;
- links to the editing sections;
- an individual Delete link.
The checkboxes are used when exporting one or more maps or when deleting several maps through Bulk Actions.
Shortcode
Every map has its own shortcode, for example:
[usahtml5map id="0"]
The ID identifies the specific map configuration that WordPress should display. Always copy the shortcode from the required map row rather than typing it manually.
Edit links
The links in the Edit column open the main sections of the selected map:
- General Settings
- Detailed Settings
- Groups Settings
- Points Settings
- Tools
- Preview
These links provide a quick way to move directly from the map list to the required part of the interface.
Creating and managing maps
Creating another map
To create an additional map:
- Enter a name in the New map name field.
- Click Add new map.
- Find the new map in the list.
- Open General Settings or another editing section.
- Configure the map for its intended use.
Each new map begins as a separate configuration. Changes made to one map do not change the settings of other maps.
Multiple maps can be useful when you need:
- different sales territories for separate departments;
- separate maps for different pages;
- a dealer map and an office map;
- maps with different state content;
- different versions of a map for testing.
Editing an existing map
Use the links in the Edit column to open a particular section.
For example:
- use General settings to configure the overall appearance and behavior;
- use Detailed settings to edit individual states;
- use Groups settings to combine states into regions;
- use Points settings to add and configure markers;
- use Tools for CSV operations and Custom JavaScript;
- use Preview to test the finished map.
You can also select a map from the map selector displayed at the top of the individual settings pages.
Deleting maps
To delete one map, click the red Delete link in its row.
To delete several maps:
- Select their checkboxes.
- Choose the delete action from Bulk Actions.
- Click Apply.
Deleting a map removes its configuration. Pages containing that map’s shortcode will no longer be able to display it correctly.
Before deleting an important map, export it to a JSON file so that the configuration can be restored later.
Publishing a map with its shortcode
After configuring and testing a map, copy its shortcode from the Maps Dashboard.
To add the map to a WordPress page or post:
- Open the page or post in the WordPress editor.
- Add a Shortcode block.
- Paste the shortcode copied from the Maps Dashboard.
- Preview the page.
- Publish or update it.
For example:
[usahtml5map id="0"]
The ID shown above is only an example. Your map may have a different ID.
The shortcode can also be used in page builders and other WordPress elements that support shortcode output.
Exporting, importing, and backing up maps
The Export/import section works with complete map configurations in JSON format.
This is different from the CSV tools available in the Tools section. JSON is intended for complete backups and transfers, while CSV is intended for editing state or point data in a spreadsheet.
Exporting maps
To export one or more maps:
- Select the checkbox beside each map you want to save.
- Click Export in the Export/import section.
- Save the generated JSON file to your computer or another secure location.
A JSON export can be useful for:
- creating a backup before major changes;
- saving a completed map configuration;
- moving maps to another compatible WordPress installation;
- protecting a map before deletion;
- transferring settings from a test website to a production website.
Use a descriptive filename that includes the date, for example:
us-map-backup-2026-08-04.json
Keep important backups outside the website’s hosting account. A backup stored only on the same server may not be available if the website or hosting account becomes inaccessible.
Importing maps
To import a previously exported configuration:
- Open the Maps Dashboard.
- Click Import.
- Select a compatible JSON file.
- Complete the import process.
- Open the imported map in Preview.
- Check its content and behavior before publishing it.
After moving a map between websites, verify any settings that may refer to the original site, including:
- internal page links;
- image URLs;
- Custom JavaScript;
- page element IDs;
- integrations with other plugins.
Keep the original JSON file until you have confirmed that the imported map works correctly.
JSON export and CSV export
The two export formats serve different purposes:
JSON export saves complete map configurations and is intended for backup, restoration, or migration.
CSV export contains state or point data in a spreadsheet-friendly format and is intended for bulk editing.
Use JSON when you need to preserve the entire map. Use CSV when you need to update many state or point settings in a spreadsheet.
Access rights for editors
The Access rights to plugin settings section controls whether WordPress users with the Editor role can access and modify the map settings.
To grant access:
- Select the Editor checkbox.
- Click Save.
Enable this option only for trusted users. Editors with access to the plugin can change map content, colors, links, groups, points, and other settings.
Leaving the option disabled limits access according to the plugin’s default permissions.
Next step
After creating or selecting a map, the next step is to configure its overall appearance and behavior in General Settings.
Continue with the General Settings guide, return to the complete WordPress US Map Plugin overview, or visit the US Interactive Map product page to view the demo and current license options.