Adding Custom JavaScript to the Map Plugin
Our map plugins have a fully visual interface and do not require coding. Although for advanced developers there are additional options to add custom JavaScript code. This code executes after the map is drawn and has access to most of the map’s properties. Thanks to this feature, you can implement complex scenarios for the use of maps.

Enhancing capabilities of Map plugins for WordPress
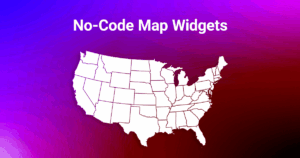
Our plugins are well-acclaimed for their extremely simple interface, so even a novice WordPress user can easily configure and embed an interactive map on his or her WordPress website. All settings are visual and do not require any coding. Settings cover colors, tooltips, adding points, grouping countries into regions, and other possibilities.
In the post ‘5 Features of the US Map for WordPress Plugin,’ you can find some examples of map interaction that even a complete rookie can implement.
At the same time, our maps have JavaScript API, so experienced developers can implement complex and non-standard usage scenarios for plugins. And now this gets even simpler thanks to the custom JavaScript code field already added into the plugin settings.
The following update refers to the following products: US Map for WP, World countries Map for WP, as well as all single-level map plugins.
How custom JavaScript works
Custom JavaScript code is executed when the map is drawn for the first time. Any further redraws of the map do not trigger the execution. However, if you have multiple instances of the map on the same page, each one will execute its own custom JS code.
In the script, you can use any JS code, such as: executing standard or custom functions, reading and writing values of variables, parsing the HTML document, and whatever else. In addition, in the script you have access to the following variables:
map – an instance of the map that provides access to public methods of the map class. This includes callback handlers that allow you to perform certain actions in response to certain events (see below).
You can find the complete list of methods available to you here.
containerId – this variable holds the HTML id of the container the map is placed to.
Example:
 map.on('click', function (event, sid, map) {
    var name = map.fetchStateAttr(sid, 'name');
    console.log('Clicked state is: ' + name);
 });
How to add custom JavaScript to the map
Open map settings and switch to the ‘Tools’ tab. Scroll down to the Custom JavaScript section:

You can insert custom JavaScript code in the corresponding textbox. Click the ‘Save Changes’ button.
Here is what the above example code does. It fetches the name of the state on the map that a user has clicked and prints that name to the console.
What can you do with custom JavaScript?
Since you have access to most of the map object methods as well as to the HTML of the page, you can do almost anything. Let’s review some basic functions provided by the map object:
Callback functions
By using the FlaMap.on method you can assign a callback function to certain events including: on click, on double click, on mouse move, on mouse in, on mouse out, on mouse button down, and on mouse button up.
The callback function receives the original event that triggered the callback; the state id corresponding to the event (for example, if the event is a click, the function receives the id of the clicked state); the map object.
Map state manipulation
The map object provides a number of ways to view or modify various state settings: name, color, label, is a state is shown or hidden and is a state is enabled or not. You can also modify the URL assigned to a specific state.
Points manipulation
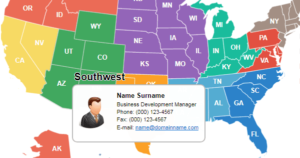
Map points are used to mark various objects on the map: headquarters, dealership network sites, local offices, and so on. Using custom JavaScript, you can track clicks on points, as well as change their parameters: label, color, size, coordinates, and assigned URL.
Map drawing and overall appearance
You can adjust the general settings of the map and initiate redrawing using the map.reloadMap() method.
Please refer to the documentation on the complete list and description of FlaMap methods.
Examples of use
Auto-fill forms
A map combined with a form can simplify filling in the data for a user.
For example, if a form has such fields as State or Country, then normally a user would have to manually type or select these values from the dropdown. With a map enhanced with custom JS code, you can simplify this down to just one click on the map.
What you need is to write a callback function and pass it to the FlaMap.on method. In the callback function, you fetch the name of the clicked state/country and insert the corresponding state/country values into the form.
Select multiple states
If you need to give your visitor the possibility to select multiple states, using custom JavaScript can help. We have reviewed a similar example for non-WordPress maps here: https://www.fla-shop.com/howto/interacting-with-maps-via-checkboxes/
Tracking clicks on states in Google Analytics
A common use case of our map plugins is displaying a dealership map for a given country or state. When a state or a country is clicked on the map, the corresponding contact information displays side-by-side with the map. And now, if you want to know how often this or that state or country is clicked and see this info in Google Analytics, you can use custom JavaScript to integrate the map to GA and therefore see the map click data.
Specifically, you need to invoke Google Analytics scripts (analytics.js, gtag.js, etc) from your custom JS code.
Conclusion
As you see, custom JavaScript added to the interactive map can greatly enhance its basic functionality. Enjoy!